Common Questions About BLACKline HHP Vinyl Fencing
BLACKline HHP is a thermoplastic material formulated to maximize strength, durability, stability, and style. Low maintenance, attractive, durable, and resistant to fire; these are just a few of the properties that have dramatically increased the use of thermoplastic materials for fences.
The main ingredient is a rigid CPVC homopolymer made from 100% virgin material. BLACKline HHP products are mono-extruded and feature impact modifiers with the highest level of colorant and UV stabilizers to protect against fading.
Over the years, plastic has become a major environmental concern. However, Chlorinated Polyvinyl Chloride (CPVC) cannot be grouped into this category because it is not made from 100% hydrocarbons like most plastics, and it has a unique manufacturing process.
CPVC is made from a combination of crude oil, natural gas, and over 60% chlorine derived from common salt. This makes it one of the most energy-efficient materials to produce. In addition, a minimal amount of fossil fuel is used in the production of CPVC, so very little carbon dioxide is emitted into the atmosphere during manufacturing. A large percentage of the plastic products made today are not recyclable, whereas CPVC is fully recyclable and can be recycled over and over again.
We want to know you and understand exactly what you need to ensure that you are completely satisfied, receive fair and competitive pricing, and get the most out of our products. At BLACKline HHP, we take pride in the relationships we have developed and want to have the opportunity to talk to potential customers.
This helps us to be sure they are getting the right answers and products for the fencing requirements. Homeowners can request an instant quote on our site, but we're always here to offer customized support.
Our fencing will be one of the safest parts of your home, especially if you have children. The smooth surfaces don't have nails that can pop out or wood that can splinter. Our fencing products don't contain lead, nor do they require the heavy metals and chemicals used to treat and maintain. Since our fencing doesn't break down, nothing can contaminate your soil or groundwater. They're also designed to meet pool safety regulations.
BLACKline HHP fences never need to be repainted. All you have to do is rinse them occasionally with a garden hose. Its smooth, non-porous surface resists mildew in most conditions. However, when humidity is high, it may be necessary to remove mildew with water or a mild bleach solution.
All of BLACKline HHP's fence products feature a maintenance-free lifetime guarantee.
Most thermoplastic products lose some of their flexibility in cold temperatures, but BLACKline HHP's products won't break or crack unless subjected to unusual impact. They also will not warp or splinter, and are designed to accommodate normal temperature swings.
All outdoor products will fade over time. However, our mono-extruded fences are field-proven to maintain their deep color since they're manufactured with extensive UV stabilizers for ultimate protection. This means that all of our vinyl fencing products fade slowly and uniformly without significant color change.
BLACKline HHP's vinyl fences are virtually maintenance-free, won't rust or corrode, and don't require painting.
Additionally, our fences won't blister, rot, rust, or peel, and will weather uniformly. Because color is extruded throughout the product, our vinyl fences do not need paint or other surface treatments, such as water sealants and stains. Our vinyl products are also stain-resistant and unaffected by rock salt.
Early BLACKline HHP products helped shape the market but revealed common issues seen across the industry, including fading, chalking, and heat-related warping in dark-colored vinyl. Learning from those challenges, the BLACKline HHP team took a different approach: reengineering the product from the ground up using CPVC, a heat-resistant material chosen specifically to prevent the softening and distortion that occur in standard PVC and polyethylene. Production began in 2006 with a focus on long-term performance, resulting in the BLACKline HHP fencing system trusted today.
BLACKline HHP is built on decades of research, premium materials, and rigorous testing. Our products are made from CPVC, the same material used in hot water pipes, chosen specifically to resist heat-related warping and surface breakdown. Every product is backed by strong warranties and supported by a team that values transparency, quality, and long-term performance.
BLACKline HHP offers a premium alternative to standard vinyl fencing. Our engineered materials are designed to hold their shape, color, and strength in harsh environments. The result is a low-maintenance fence that delivers lasting performance, refined appearance, and value for residential and select commercial applications.
BLACKline HHP is a premium black vinyl fencing, railing, and gate product that's built for durability, style, and long-term performance. Unlike standard vinyl, our CPVC material withstands extreme heat, resists warping, and maintains its rich black color for decades.
We use premium carbon black pigments combined with enhanced UV inhibitors and reinforcing materials to improve strength and impact resistance. This approach helps maintain a bold, consistent black finish while reducing fading, chalking, and surface breakdown over time.
Our mission is built on honesty, integrity, and customer satisfaction. We strive for excellence, provide transparent guidance, and deliver durable products that homeowners and contractors can trust for years.
Common Questions About Our Black Vinyl Fences
Black vinyl can fade significantly, but BLACKline HHP is different. We use a professional-grade CPVC formula that withstands temperatures above 200°F. While regular PVC softens and bows, our fences are engineered to stay perfectly straight and structural even in the most intense direct sunlight.
No. Unlike "cap-stocked" products that only have a thin layer of color, our black pigment is mono-extruded throughout the entire material. Combined with high-level UV stabilizers, this prevents the surface oxidation and fading common in lower-quality plastics, keeping your fence jet-black for life.
A fence is only as good as the quality of its materials. Some vinyl fences look cheap because they're made with low-quality materials by manufacturers who care more about profit than quality. At BLACKline HHP, our vinyl fences NEVER look cheap. One of our customers says that she has "people driving by just to check out the new fence"! You can read more BLACKline HHP reviews here.
Absolutely. Because our material is engineered for high-heat resilience, it maintains its impact strength better than standard vinyl. There are no splinters, nails, or toxic chemical treatments to worry about, making it a safer, "low-stress" choice for containing livestock and family pets.
It's a common myth, but the difference is negligible. While the material surface absorbs more heat than white vinyl, it does not act as a radiator for your yard. In fact, our high-heat formula is specifically designed to manage that thermal load, which keeps the fence structurally sound without transferring heat to the surrounding air.
BLACKline HHP fencing is virtually maintenance-free. Because our CPVC surface is non-porous, dirt and dust don't bond to it the way they do with wood. A simple rinse with a garden hose once or twice a year is usually all it takes to maintain that "day-one" black finish. No painting or sealing is ever required.
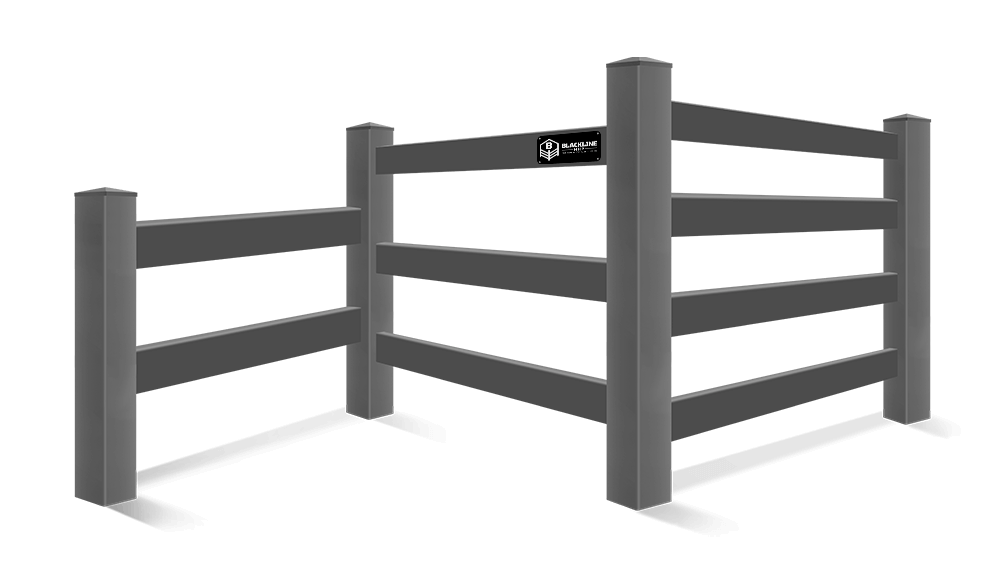
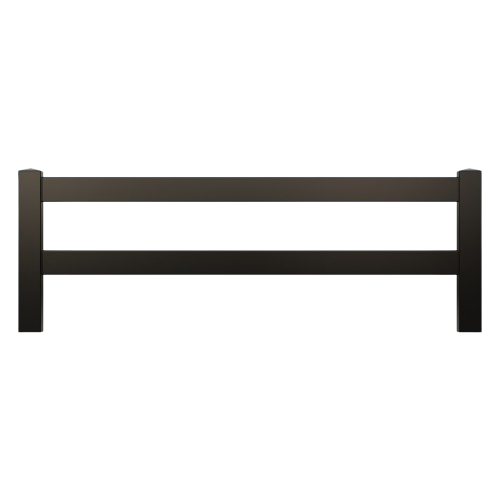
Common Questions About Our Black Vinyl Ranch Rail Fences
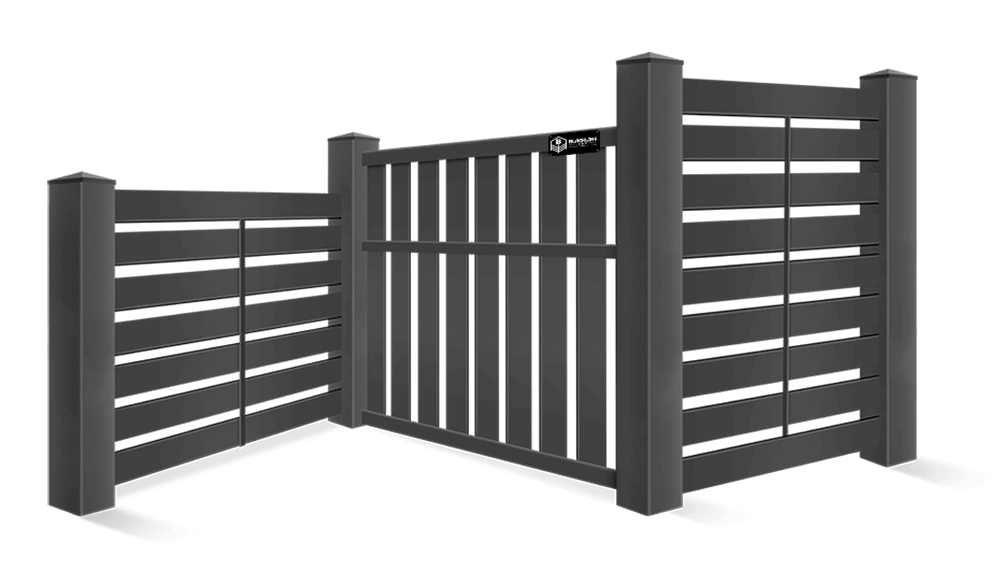
The ranch rail style is a traditional fence style for ranches and farms throughout the country. Ranch rail fencing features horizontal rails attached to vertical posts, creating a smooth, continuous style that seems to flow along the fence line. With our ranch rail fences, you can choose between 2-, 3-, and 4-rail options.
Yes. BLACKline HHP vinyl fences are engineered to resist heat, warping, and harsh weather. With proper installation by a certified BLACKline HHP professional, your fence will maintain its strength and elegance for decades.
Vinyl ranch fences are more expensive than wood fences due to their longevity and the materials used. While wood rail fences are less expensive to purchase, they require much more maintenance and care than a vinyl fence from BLACKline HHP. With a vinyl fence, you can enjoy decades of durability and beauty with very little maintenance costs.
Vinyl fencing is made from polyvinyl chloride (PVC), a plastic-based material that won't crack or splinter. Unlike wood fences, vinyl ranch rail fences do not rot, are not susceptible to insects, and do not need to be refinished.
Yes. Vinyl ranch rail fences are smooth, strong, and free of sharp edges, making them safe for horses and other livestock. Their durability ensures they won't splinter or break under normal use.
BLACKline HHP vinyl fences are built for lasting performance and minimal upkeep. With professional installation by a certified BLACKline HHP installer, your ranch rail fence can maintain its strength, appearance, and safety for decades, resisting heat, weather, and daily wear.
Common Questions About Our 2-Rail Ranch Fences
You can view our beautiful 2-ranch rail vinyl fences, as well as our other fences, in our vinyl fencing gallery. Our gallery includes pictures submitted by our customers and fence contractors throughout the United States. If you'd like to get a quote on a fence product or custom vinyl product, please contact us. Upon request, we can also provide more information on shipping, our limited lifetime warranty, specific costs for your required dimensions, and more!
Below is an excerpt from our limited lifetime warranty on each of our ranch rails fences (view full warranty here):
Subject to the conditions and limitations listed below, BLACKline HHP (BLHHP). BLHHP warrants its BLACKline HHP brand fence and railing products to be free from defective workmanship and materials and, when subject to normal use and service, against surface peeling, rot, ground insects, splitting, corrosion, flaking, rusting, blistering, abnormal weathering, abnormal distortion or abnormal discoloration.
This warranty is limited to the lifetime of the original property owner for as long as he/she owns the real estate on which the product is applied. If the real estate to which the product is applied is a condominium or is owned by a party other than a resident owner, including homeowners' associations, corporations, partnerships, unincorporated associations, churches, schools, government or public entities, etc., the warranty period is twenty (20) years.
If during either period, the product is found to exhibit any of the above-listed defects, BLHHP will, at its sole and absolute discretion, provide a replacement product, refund the purchase price, or repair the affected product.
In no instance will the cost of the remedy to BLHHP exceed the original purchase price of the affected product. In all cases, the product must be installed in accordance with its printed installation instructions in a workmanlike manner.
While wooden rail fences are cheaper at first, they require much more care in the long run. With a vinyl fence, however, you receive durability and beauty for decades with very little fence care needed. A vinyl ranch fence blends beautifully with your property but is more expensive than wooden ranch fences because of its beauty, longevity, and material differences.
Our experience and knowledge regarding the color stability of black thermoplastic material have led to us formulating a black fencing material that doesn't succumb to fading or chalking. Our proprietary blend of colorant and UV inhibitors makes fading and chalking a non-issue.
This combination of color stability and heat tolerance makes BLACKline HHP's fencing superior options in the world of dark-colored fencing materials. When you choose our fencing, you get a product that will stand the test of time and look good as new for years.
Our vinyl 2-rail ranch fencing is made from polyvinyl chloride (PVC), a plastic-based material that is low-maintenance and won't crack or splinter. Unlike wooden fences, vinyl ranch rail fences do not rot, are not susceptible to insects, and do not need refinishing.
The black horse and 2-rail ranch rail fence options from BLACKline HHPare the first fences to be successfully designed for high-temperature performance. Our 2-rail fencing is developed using a unique, high-temperature thermoplastic formulation, holding up to the summer heat with ease. Where other plastic fences sag and distort, vinyl fences from BLACKline HHPstay as strong and sturdy as the day they were installed.
Vinyl ranch fences are more expensive than wooden ranch fences due to their style, longevity, and material differences. While wooden 2-rail ranch fences are cheaper at first, they require much more maintenance and care. With a 2-rail ranch vinyl fence, however, you receive durability and beauty for decades with very little maintenance needed.
A traditional choice for horse owners, the 2-rail ranch style is used on numerous ranches and farms throughout the United States. Often, you can notice the familiar 2-rail ranch fences along the side of the road.
Common Questions About Our 3-Rail Ranch Fences
A traditional choice for horse owners, the 3-rail ranch style is used on numerous ranches and farms throughout the United States. Often, you can notice the familiar 3-rail ranch fences along the side of the road.
Vinyl ranch fences are more expensive than wooden ranch fences due to their style, longevity, and material differences. While wooden 3-rail ranch fences are cheaper at first, they require much more maintenance and care. With a 3-rail ranch vinyl fence, however, you receive durability and beauty for decades with very little maintenance needed.
Our vinyl 3-rail ranch fencing is made from polyvinyl chloride (PVC), a plastic-based material that is low-maintenance and won't crack or splinter. Unlike wooden fences, vinyl ranch rail fences do not rot, are not susceptible to insects, and do not need refinishing.
The black horse and 3-rail ranch rail fence options from BLACKline HHP are the first fences to be successfully designed for high-temperature performance. Our 3-rail fencing is developed using a unique, high-temperature thermoplastic formulation, holding up to the summer heat with ease. Where other plastic fences sag and distort, vinyl fences from BLACKline HHP stay as strong and sturdy as the day they were installed.
Our experience and knowledge regarding the color stability of black thermoplastic material have led to us formulating a black fencing material that doesn't succumb to fading or chalking. Our proprietary blend of colorant and UV inhibitors makes fading and chalking a non-issue.
This combination of color stability and heat tolerance makes BLACKline HHP's fencing superior options in the world of dark-colored fencing materials. When you choose our fencing, you get a product that will stand the test of time and look good as new for years.
Often, a customer with a ranch will choose our vinyl fencing with rails as a durable horse fence. We provide custom quotes to ensure that each customer receives a fair price for their horse fence. Once you request a free fencing quote, we'll be more than happy to discuss the number of fence posts you need and the details of the weather resistance in all of our fencing. Our goal is to clearly define the value that our fencing will add to your property, complete with the right dimensions and the right price.
You can view our beautiful 3-rail ranch vinyl fences, as well as our other fences, in our vinyl fencing gallery. Our gallery includes pictures submitted by our customers and fence contractors throughout the United States. If you'd like to get a quote on a fence product or custom vinyl product, please contact us. Upon request, we can also provide more information on shipping, our limited lifetime warranty, specific costs for your required dimensions, and more!
Below is an excerpt from our limited lifetime warranty on each of our ranch rails fences (view full warranty here):
Subject to the conditions and limitations listed below, BLACKline HHP (BLHHP). BLHHP warrants its BLACKline HHP brand fence and railing products to be free from defective workmanship and materials and, when subject to normal use and service, against surface peeling, rot, ground insects, splitting, corrosion, flaking, rusting, blistering, abnormal weathering, abnormal distortion or abnormal discoloration.
This warranty is limited to the lifetime of the original property owner for as long as he/she owns the real estate on which the product is applied. If the real estate to which the product is applied is a condominium or is owned by a party other than a resident owner, including homeowners' associations, corporations, partnerships, unincorporated associations, churches, schools, government or public entities, etc., the warranty period is twenty (20) years.
If during either period, the product is found to exhibit any of the above-listed defects, BLHHP will, at its sole and absolute discretion, provide a replacement product, refund the purchase price, or repair the affected product.
In no instance will the cost of the remedy to BLHHP exceed the original purchase price of the affected product. In all cases, the product must be installed in accordance with its printed installation instructions in a workmanlike manner.
According to HomeAdvisor's 2021 analysis of the costs for vinyl fencing and PVC fencing per foot, the cost per foot for ranch rail fence (3 rail) is between $15-$25 per linear foot. The total average price that a typical 3-rail fence customer can expect to pay is between $1500-$7,500.
Thanks to vinyl's strength and flexibility, vinyl fencing is quickly becoming a preferred fencing material for many ranchers, horse owners, and equestrian centers. The advantage of using vinyl for post-and-rail fencing needs is that blows from horses, farm animals, and equipment do not have as big of an impact on it as with other fencing materials.
Many customers interested in fencing for the animals on their property will choose the three-rail ranch style because it offers the perfect height and strength for their animals. If you're interested in purchasing a vinyl three-rail fence, please fill out the contact form on our website. One of our sales representatives will be in touch with you through email or phone as soon as possible.
As every horse owner knows, not all fences are good for horses. For instance, barbed wire fences and square mesh fencing can entangle horses, rip their hide, or do fatal damage to their tendons and internal organs. A vinyl horse fence, on the other hand, will provide strength and durability of a post and rail without the disadvantages of wood, barbed wire, or other fencing materials.
Every horse owner wants to offer their animals safety and protection while keeping their animals enclosed. There are a variety of fence materials available these days, each with its own color choices, accessory items, maintenance needs, size options, and advantages.
In many cases, building codes will determine the fencing materials you use for your horses. A good fence keeps your horses from escaping and getting injured.
Many horse owners choose to use either white vinyl or black vinyl for their horse fence because of the unique versatility of either color. While we don't offer white vinyl fencing, we do offer black 3-rail vinyl horse fence products. Unlike many dark-colored vinyl and PVC fences, our fences are mono-extruded and not painted.
Common Questions About Our 4-Rail Ranch Fences
A traditional choice for horse owners, the 2-rail ranch style is used on numerous ranches and farms throughout the United States. Often, you can notice the familiar 2-rail ranch fences along the side of the road.
Vinyl ranch fencing is more expensive than wooden ranch fencing due to its style, longevity, and material differences. While wooden 4-rail ranch fencing is cheaper at first, it requires much more maintenance and care. With a 4-rail ranch vinyl fence, you get a durable aesthetic for decades with very little maintenance.
Our vinyl 4-rail ranch fencing is made from polyvinyl chloride (PVC), a plastic-based material that is low-maintenance and won't crack or splinter. Unlike wooden fences, vinyl ranch rail fencing does not rot, is not susceptible to insects, and does not need refinishing.
The black vinyl 4-rail ranch rail fence options from Blackline HHP are the first fences to be successfully designed for high-temperature performance. Our 2-rail fencing is developed using a unique, high-temperature thermoplastic formulation, holding up to the summer heat with ease. Where other plastic fences sag and distort, vinyl fences from Blackline HHP stay as strong and sturdy as the day they were installed.
Years of real-world experience with dark fencing materials led us to engineer a black vinyl formulation that resists fading, chalking, and heat-related distortion. Many dark fences struggle under prolonged sun exposure. Ours is built differently.
Our proprietary blend of colorant and UV inhibitors is integrated throughout the material, not applied as a surface coating. This helps the fence maintain its deep black appearance over time without peeling, flaking, or whitening.
Combined with enhanced heat tolerance, this approach makes BLACKline HHP's 4-rail ranch fencing a dependable option for homeowners who want a black fence that performs for the long haul.
While wood rail fences are cheaper initially, they require much more care in the long run. With a vinyl fence, however, you receive durable strength for decades with very little care required.
A vinyl ranch fence blends beautifully with your property but is more expensive than wood ranch fences because of its appearance, longevity, and material differences.
Yes. Many ranch and equestrian property owners choose our 4-rail vinyl fencing for horse containment due to its strength, visibility, and low maintenance requirements.
Each project is quoted individually to ensure proper post spacing, rail height, and overall layout based on the property and use case. Our team works with customers to define the right configuration so the fence performs reliably while adding lasting value to the property.
You can view our 4-rail ranch fencing and other styles in our vinyl fencing gallery. The gallery includes completed installations from certified fence contractors across the country.
If you need pricing, custom sizing, shipping details, or warranty information, contact us directly. We're happy to help you explore options and connect you with a certified installer.
Yes, we offer a limited lifetime warranty to protect your 4-rail ranch fence. This warranty assures you that your fence and railing products will be free from defective workmanship and materials and, when subjected to normal use and service, won't peel, rot, attract insects, split, flake, rust, blister, or experience abnormal discoloration, weathering, or distortion.
Our warranty is limited to the lifetime of the original property owner for as long as they own the real estate on which their fence is located. In other words, your warranty applies to your fence for 20 years, as long as you own the land that it's installed on.
At our discretion, we will repair, replace, or refund the affected product during the warranty period.
According to HomeAdvisor's 2021 analysis of the cost of vinyl and PVC fencing per foot, the cost per foot for a 4-rail ranch fence is between $15 - $25 per linear foot. The average price a customer can expect to pay for a typical 4-rail fence is between $1,500 and $7,500.
For accurate pricing, a custom quote is recommended based on your specific project needs.
Yes. Vinyl has become a preferred material for many farms and ranches due to its strength, flexibility, and resistance to weathering.
Unlike wood, vinyl won't rot, splinter, or require chemical treatments. Impacts from livestock or equipment are less likely to cause permanent damage, making it a reliable option for long-term farm fencing applications.
Barbed wire fences and square mesh fencing can entangle animals, rip their hide, or do fatal damage to their tendons and internal organs. A vinyl ranch rail fence, on the other hand, will provide the strength and durability of a post and rail without the disadvantages of wooden, barbed wire, or other fencing materials.
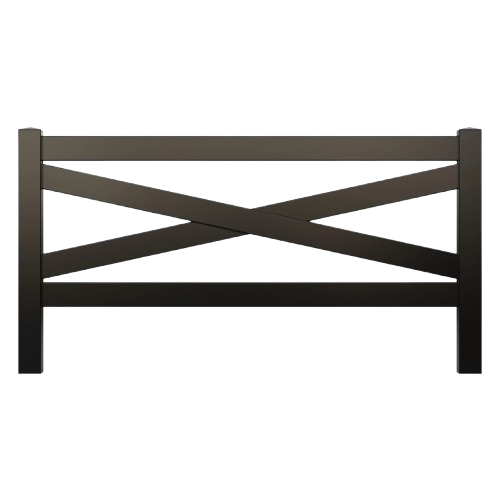
Common Questions About Our Crossbuck Ranch Fences
A crossbuck ranch fence features a classic crisscross "X" design that combines strength and visual appeal. It's perfect for farms, ranches, and large properties, offering both functional livestock containment and a timeless, elevated look that enhances any property.
Our fences are crafted from premium CPVC black vinyl, the same material used in hot water pipes. Unlike standard PVC or HDPE, which can warp or soften under intense sun, CPVC is highly heat-resistant, keeping your fence straight, strong, and color-rich even in extreme temperatures. This advanced material prevents sagging, chalking, and fading, ensuring your fence maintains its refined appearance for decades.
Crossbuck fences are ideal for safely containing horses, cattle, goats, and other livestock, while also marking property boundaries and protecting gardens or orchards. Beyond practical use, their refined design adds a sophisticated, elevated look, making them a stylish backdrop for landscaping or outdoor living spaces.
Crossbuck fences are ideal for farm and ranch owners, equestrians, landscapers, contractors, and homeowners with large properties. The combination of field-tested materials, timeless designs, and low-maintenance vinyl fencing makes it the perfect choice for anyone seeking a lasting, functional barrier.
Yes! Unlike wood fences, vinyl requires no painting, staining, or sealing. The smooth, splinter-free surface is safe for children and animals, and cleaning is as simple as a quick rinse with a garden hose. This lets you spend more time enjoying your property and less time maintaining your fence.
Our team at BLACKline HHP provides detailed installation guides, CAD drawings, and technical support to make installation straightforward. If you prefer, we can recommend local contractors we've worked with, ensuring your fence is installed efficiently and correctly while maintaining its longevity and aesthetic appeal.
Common Questions About Our Diamond Rail Ranch Fences
In the past, horse owners chose wood diamond post-rail fences. However, few people have the time to paint, sand, and stain their fences to maintain the style and curb appeal. This makes vinyl fencing an attractive choice for those who recognize the value included in its price.
We can accommodate most requests for custom vinyl fencing. Please contact our sales team for a custom quote.
We provide assembly instructions and installation guidelines for all our fencing, including 2-rail, diamond rail, and privacy fences.
Black vinyl fencing is our specialty. Instead of having a layer of black laid over the white vinyl, our fences are made with color infused in the material. They are uniquely manufactured to be heat-resistant and do not chalk or warp in sunlight. Whether it's 3-rail, 2-rail, diamond rail, or another type of vinyl fencing, you can rest easy knowing you're getting the best quality from BLACKline HHP.
Our premium vinyl fences come in a range of styles, including ornamental, post-rail, and other vinyl styles. Contact us to learn more about our top-quality vinyl fences!
Many fence companies sell vinyl fencing that's been painted black or has a thick layer of black vinyl laid over it. For a while, these fences look nice, but over time, the cheap paint or vinyl cover will wear off, fade, and reveal chips, cracks, and marks. This leads to more maintenance, touch-ups, and eventually, early replacement.
BLACKline HHP's vinyl fences aren't painted black; they're made from pure black vinyl and engineered to maintain strength in high-heat conditions. Our 2-rail, diamond post-rail, and privacy fences are all engineered to maintain their classic, elegant beauty for decades. Perfect for pets, children, and livestock, our vinyl fences are the perfect option for your property!
Yes, BLACKline HHP offers vinyl fence gates with locks and other accessories. We design and manufacture each gate to fit seamlessly with our other vinyl products. This way, whether you choose a rustic fence with rails or a refined privacy fence, you'll always get the best fence quality and price!
To best serve customers seeking the perfect two-rail, diamond, or privacy fence, we provide tailored fence quotes rather than an online account you sign in to or an online shopping cart. Instead, when you contact our sales team, we'll address any comments or questions you have and create a quote tailored to your needs.
As a leading vinyl fence manufacturer, we provide fence dealers and property owners with premium black vinyl fencing products that remain strong and beautiful for decades. Superior to wood rails and posts, our privacy fences, 2-rail, diamond, and ornamental vinyl fences are ideal for those who want to complement their home design with elegance.
Contact us today to get your vinyl fence with the perfect length and design for your needs! We're open during standard business hours on weekdays. You can contact us through our website contact form or by phone. Feel free to check out our blog and recent news, too. We'd love to hear from you!
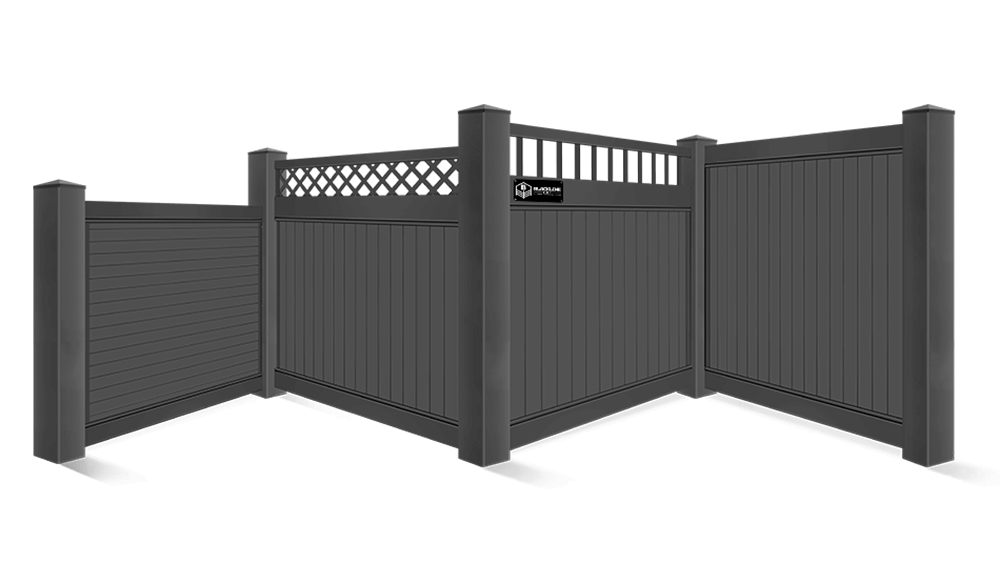
Common Questions About Our Black Vinyl Privacy Fences
Treated pine wood fencing is typically the lowest-cost option upfront. However, wood requires regular staining, sealing, and eventual board replacement.
Vinyl privacy fencing costs more initially, but it delivers long-term performance with minimal maintenance. For homeowners focused on durability, consistent appearance, and lifetime value, vinyl is often the smarter investment over time.
Installing a privacy fence on your own property is not considered rude and is very common for homeowners who value security, noise reduction, and personal privacy.
Issues usually arise only when a fence crosses a shared property line or violates local regulations. Before building on a boundary, it's important to confirm property lines and follow local fence codes to avoid disputes.
The appearance of a vinyl fence depends entirely on the quality of the material and manufacturing process. Lower-grade vinyl can warp, discolor, or develop a thin, plastic look over time.
BLACKline HHP vinyl privacy fences are engineered for structure, color consistency, and heat resistance. The result is a solid, refined fence that holds its appearance year after year.
Absolutely! Vinyl privacy fences do not rot, attract insects, or require painting or staining. It maintains consistent spacing, straight lines, and structural integrity in conditions that cause many wood fences to fail. BLACKline HHP vinyl privacy fences are designed for residential, agricultural, and commercial use, offering dependable performance with minimal upkeep and long-term reliability.
Dark-colored fences often struggle with heat, leading to warping, softening, or surface degradation. BLACKline HHP fencing is engineered with enhanced heat tolerance to address these issues.
Our black vinyl is formulated to maintain shape and structural integrity under prolonged sun exposure, helping the fence perform reliably in hot climates where standard black fencing products can fall short.
Many black vinyl fences fade because the color is applied as a surface treatment or paint. BLACKline HHP fencing is mono-extruded, meaning the color runs throughout the material rather than sitting on the surface.
This approach helps resist fading and chalking while maintaining a consistent black finish over the life of the fence. Homeowners who want a dark privacy fence without ongoing cosmetic upkeep are encouraged to ask for BLACKline HHP and work with a certified installer to ensure proper installation and performance.
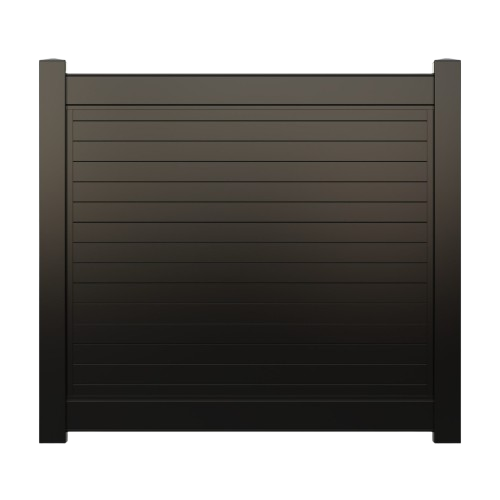
Common Questions About Our Horizontal Privacy Fences
Most black vinyl fences are made from standard PVC, which softens under extreme sun, much like a plastic water bottle left outside. BLACKline HHP uses high-heat CPVC, engineered to handle surface temperatures well beyond what typical vinyl can withstand. That heat stability prevents warping, chalking, and color breakdown, allowing the fence to keep its rich black finish and clean lines year after year.
Horizontal privacy fencing pairs beautifully with modern, contemporary, farmhouse, and transitional homes. Its clean lines create structure without feeling heavy, making it ideal for backyards, pools, patios, and outdoor living areas. The design feels intentional and architectural, elevating the entire space rather than simply enclosing it.
Think of the fence as the frame, not the focus. The deep black finish recedes visually, allowing landscaping, furniture, lighting, and gatherings to stand out. Whether it's a poolside retreat, a fire pit, or a quiet evening on the patio, the horizontal privacy fence creates a calm, private, refined backdrop that enhances how you use and enjoy your outdoor space.
Yes. While BLACKline HHP is a premium product, it's designed to eliminate the common failures that lead to repairs, replacements, and frustration. There's no repainting, no sagging or melting panels, and no fading over time. Homeowners invest once and enjoy decades of performance, making it a smarter long-term value than lower-cost alternatives.
Absolutely. BLACKline HHP fences have smooth, non-porous surfaces with no splinters, sharp edges, or exposed fasteners. The material stays structurally stable in heat and cold, providing a secure, comfortable boundary for kids and pets while maintaining a polished appearance.
BLACKline HHP has been manufacturing premium vinyl fencing products for over a decade, building its reputation through real-world performance and continuous refinement. Every product is informed by field-testing, contractor feedback, and a commitment to solving the long-standing issues found in black vinyl fencing.
Common Questions About Our Lattice Top Privacy Fences
A vinyl privacy fence offers long-term performance without the maintenance demands of traditional materials. It won't rot, splinter, or attract insects, and it never needs painting or staining. For homeowners and professionals who value durability and clean design, vinyl delivers reliable protection with a consistently refined appearance.
A lattice-top privacy fence combines solid lower panels for full privacy with an open lattice accent along the top. This design creates separation where you need it while allowing light and airflow above, giving your yard a more open, architectural feel. It's a timeless style that balances privacy with visual interest.
BLACKline HHP lattice-top fences are manufactured using high-heat CPVC, the same material trusted in hot-water piping and demanding outdoor applications.
Unlike standard dark vinyl, our proprietary ultraviolet (UV) protection formulation resists warping, sagging, fading, and chalking even under intense sun exposure. The result is a fence that maintains its deep black color, crisp detail, and structural integrity for decades.
Lattice-top fences come in 5- and 6-foot heights, offering full privacy below with an elegant lattice accent above. Each option is proportioned to feel intentional and sophisticated, making it easy to complement both traditional and modern outdoor spaces.
Unlike wood, BLACKline HHP vinyl fences won't rot, warp, crack, or require ongoing maintenance. There's no need for painting, staining, or sealing, and the color won't peel, chalk, or fade over time. You get the classic appeal of a lattice design with modern materials and the sophisticated color of black vinyl that is engineered to last.
Yes. BLACKline HHP fencing systems include clear, step-by-step installation instructions designed for straightforward DIY installation. For those who prefer professional installation, we can also help connect you with experienced contractors familiar with our products to ensure a professional result.
Common Questions About Our Picket Top Privacy Fences
A picket-top privacy fence combines solid privacy panels with a classic picket accent along the top, giving your yard a refined, timeless look. It provides full privacy while adding an elegant, decorative touch that enhances your outdoor space.
BLACKline HHP picket-top fences are built from high-heat CPVC, engineered specifically to perform in conditions where standard vinyl struggles. Unlike many dark fences that fade, warp, or chalk over time, our material maintains its shape and rich black color. The result is lasting elegance without the common failures seen in traditional black vinyl fencing.
Picket-top fences come in 5- and 6-foot heights, offering both full privacy and a charming picket detail along the top. Each design adds timeless style and versatility, making it easy to complement the look of any home or yard.
Unlike wood, our black vinyl fences won't warp, rot, or fade, and they require virtually no maintenance, no painting, staining, or sealing. You get the classic picket charm without the upkeep, and a fence that will look great today and in 20 years.
Many black vinyl fences fail for the same reason a plastic water bottle warps in the sun: standard PVC softens when surface temperatures climb. BLACKline HHP fences are made from high-heat CPVC, engineered to handle extreme sun without losing shape or color.
That heat stability helps prevent warping, sagging, fading, and chalking, so your fence stays strong, safe, and visually refined for years.
Yes! Our fences include easy-to-follow installation instructions for DIY projects. If you'd rather leave it to the pros, we can also connect you with local contractors who are experienced with BLACKline HHP products to ensure a smooth, professional installation.
Common Questions About Our Solid Privacy Fences
You can view pictures of our beautiful 2-ranch rail vinyl fences, picket fences, and solid privacy fences in our vinyl fencing gallery.
Our vinyl fencing gallery features pictures that we've collected from dealers and customers throughout the United States. If you'd like to get a quote on a fence panel load or custom vinyl product, please contact us. Upon request, we can also provide more information on shipping, our limited lifetime warranty, specific costs for your required dimensions, and more!
Below is an excerpt from our limited lifetime warranty on each of our privacy fences:
Blackline HHP Products, LLC. warrants its BLACKline HHP brand fence and railing products to be free from defective workmanship and materials. Our warranty protects against surface peeling, rot, ground insects, splitting, corrosion, flaking, rusting, blistering, abnormal weathering, abnormal distortion, or abnormal discoloration.
This warranty is limited to the original property owner for as long as they own the property where the fence is installed. The warranty period is twenty years if the fence is for a condominium or is owned by a party other than a resident owner. This includes homeowners' associations, corporations, partnerships, unincorporated associations, churches, schools, government or public entities, etc.
If you find any listed defects in our vinyl fences, we will provide a replacement, refund the purchase price, or repair the product.
In no instance will the cost of the remedy to BLACKline HHP exceed the original purchase price of the affected product. In all cases, the product must be installed in accordance with its printed installation instructions in a workmanlike manner.
Wooden fences are cheaper upfront, but cost more in the end because of the ongoing maintenance costs and effort. With a privacy or lattice vinyl fence, you pay more initially but don't need to do much afterward in terms of fence maintenance.
Whether it's a picket fence or privacy fence, our innovative manufacturing processes result in a black vinyl fence that withstands hot weather.
Many people switching to a vinyl fence from the traditional wood fence appreciate the minimal maintenance and lasting beauty. Until BLACKline HHP products, vinyl fence owners were stuck with white vinyl fences since darker colors would warp and chalk in sunlight. Our products include the ideal blend colorant and UV inhibitors so fading and chalking aren't an issue.
This heat tolerance makes BLACKline HHP's a leader in the fence manufacturing industry. Our fences are superior because they're built to last for years without warping and chalking.
It means peace of mind. No repainting. No sagging panels. No wondering how it will look in five or ten years. BLACKline HHP privacy fencing is designed to be installed once and enjoyed for decades, creating a clean, refined backdrop for everyday life while protecting your investment over time.
BLACKline HHP privacy fencing is engineered to solve the problems most fences don't. Standard black vinyl can fade, melt, warp, or chalk under heat, but BLACKline HHP privacy fencing is built from high-performance CPVC that holds its shape and color year after year. The result is a fence that looks intentional, completely blocks views from the outside, performs in extreme conditions, and stays beautiful long after others start showing wear.
Answers to Black Vinyl Fence Questions
A semi-privacy fence gives you separation from neighbors or the street without making your space feel boxed in. It blocks direct sightlines while still letting light and airflow pass through, so your yard feels open, bright, and comfortable.
BLACKline HHP offers both vertical and horizontal semi-privacy fence styles. Vertical layouts feel more traditional and architectural, while horizontal layouts deliver a clean, modern aesthetic. Both are available in multiple heights, so you can find the right balance of coverage and style.
Many black vinyl fences struggle in real-world conditions, warping, fading, chalking, or softening under intense sun. BLACKline HHP is engineered specifically to solve those issues. Our high-heat CPVC mono-extruded materials maintain their shape and rich black color even in demanding environments, giving you long-term performance and a refined look you can trust from day one.
BLACKline HHP semi-privacy fences are built for long-term outdoor exposure. They're engineered to handle intense sunlight, high temperatures, wind, and seasonal weather changes without compromising appearance or structure. This durability means fewer failures, fewer replacements, and confidence that the fence will still look intentional years after installation.
No. Our systems are designed for straightforward installation and include clear, step-by-step instructions. Whether you're a contractor or a homeowner tackling a DIY project, the process is clean, logical, and efficient. If professional installation is preferred, the design makes it easy for experienced installers to work accurately and consistently.
Very little. BLACKline HHP fences are made with color built all the way through the material, not painted or coated on the surface. That means no peeling, no chalking, and no fading. There's no need for painting, staining, or sealing, just an occasional rinse to keep the fence looking elegant.
Answers to Black Vinyl Fence Questions
A horizontal semi-privacy fence uses spaced horizontal boards to create a modern, design-forward look. It offers privacy where you need it while maintaining openness and airflow. This style feels intentional and architectural, making it a popular choice for contemporary outdoor spaces.
Horizontal semi-privacy fencing works especially well around modern homes, patios, pools, and outdoor living areas. It adds structure and definition without creating a closed-in feel, acting as a clean backdrop for landscaping, hardscape, and outdoor furnishings.
Black vinyl delivers contrast and depth that lighter materials can't match. It highlights clean lines and modern design while avoiding the upkeep of painted wood or metal. Our black finish stays rich and consistent, rather than fading or turning gray over time like other black vinyl products on the market.
Standard vinyl can soften and lose rigidity when exposed to prolonged heat, which is why horizontal fences often sag over time.
BLACKline HHP is engineered with high-heat CPVC, the same material used in hot-water piping, so it maintains its shape even in intense sun. This added heat stability helps horizontal boards stay straight, aligned, and visually clean year after year.
Standard vinyl can soften or warp when exposed to prolonged heat, especially in darker colors. BLACKline HHP is engineered with high-heat CPVC to maintain straight lines and structural integrity even in strong sun. That means horizontal boards stay aligned and intentional, rather than sagging over time.
Horizontal semi-privacy fencing is a natural fit for modern and contemporary homes, where clean lines and strong geometry are part of the design language. It also works beautifully with farmhouse, coastal, and transitional styles when paired with the right materials and landscaping.
If you're drawn to a more architectural, design-forward look, horizontal fencing delivers that elevated feel while vertical styles tend to feel more traditional and classic.
Answers to Black Vinyl Fence Questions
Yes. BLACKline HHP vertical semi-privacy fences are designed for straightforward installation and include clear, step-by-step instructions. Whether you install it yourself or work with a professional, the system is built to go together cleanly and correctly. If you prefer a contractor, we can help point you in the right direction.
Vertical semi-privacy fencing pairs naturally with farmhouse, colonial, craftsman, and cottage-style homes. The upright lines echo traditional architecture while still feeling intentional and refined. It's a timeless look that works across both classic and updated landscapes.
BLACKline HHP vertical semi-privacy fencing is available in 4-, 5-, and 6-foot heights, allowing you to choose the level of separation that fits your space. Shorter heights help define boundaries and frame your yard, while taller options provide increased semi-privacy along property lines or near neighboring homes. The vertical spacing maintains an open feel while giving you control over visibility.
Absolutely. Vertical semi-privacy fencing adds clean lines and visual appeal, naturally elevating a property's appearance. The design adds height and structure without feeling heavy, creating a refined backdrop that complements modern landscaping and architecture.
Paired with BLACKline HHP's rich, fade-resistant black finish, it delivers long-term curb appeal that looks intentional from day one and years later.
Yes, because it's engineered to eliminate the common maintenance problems of outdoor fencing. BLACKline HHP uses high-heat CPVC with color throughout the material, not painted or coated on the surface. That means no peeling, no chalking, and no fading from sun exposure.
There's no need for paint, stain, or sealant, just an occasional rinse to keep it looking clean.
Yes. The spacing between vertical boards allows sunlight and breeze to pass through, keeping your yard bright and comfortable without feeling closed in.
Black vinyl ornamental fences from BLACKline HHP offer the look of wrought iron without a high level of maintenance. Unlike traditional materials, our fences are engineered with a proprietary CPVC formula that resists fading, chalking, and warping in extreme heat. Get a permanent, beautiful perimeter that increases property value without the future expenses caused by rusting or corrosion.
While metal fences are prone to rusting or corrosion over time, especially in coastal or humid environments, BLACKline HHP's heat-resistant black vinyl formula is completely impervious to moisture and salt spray. Our vinyl stays cooler to the touch in direct sunlight compared to black metal and features a "memory" that allows it to absorb minor impacts without denting or chipping the finish.
We offer a variety of styles and heights to match your property's architecture, from classic spear-top pickets to smooth-top designs. You can further customize your fence with decorative post caps (such as Gothic or Pyramid styles) and specialized gate hardware. We can accommodate various terrain slopes while maintaining a clean, professional look.
Absolutely. BLACKline HHP is a preferred choice for commercial developments, HOAs, and retail spaces because it provides a uniform, prestigious look that lasts for decades. The durability of our high-temperature vinyl means lower total cost of ownership for property managers, and our fences meet stringent safety and aesthetic requirements for high-traffic environments.
While no fence is completely maintenance-free, our vinyl fences require no painting or staining. To keep it looking new, a simple rinse with a garden hose to remove dust or dirt is usually all that's required. For stubborn spots, a mild soap and water solution will do the trick; there's no need for specialized chemicals or protective coatings.
Yes. While they offer a more refined aesthetic, our ornamental fences are built using the same industrial-grade CPVC technology found in our ranch and horse fencing. They are engineered to withstand high winds and thermal expansion, ensuring that the pickets and rails remain securely in place and structurally sound for the life of the fence.
Answers to Black Vinyl Fence Questions
BLACKline HHP railings are mono-extruded with black pigment throughout the entire material, not just surface-coated or painted. Our professional-grade CPVC formula withstands temperatures above 200°F without warping or bowing, and features the highest levels of UV stabilizers to prevent fading and chalking that is seen in other black vinyl products on the market.
Yes, our railing systems are engineered for versatile applications, including residential decks, front porches, back patios, and commercial installations. The superior heat resistance and structural integrity make them ideal for any outdoor setting where you need reliable, attractive railing.
Our CPVC formulation is designed to accommodate normal temperature swings without cracking or warping. The material maintains flexibility in cold weather while resisting heat distortion in summer, making it suitable for climates across the United States.
Absolutely. Our railings feature smooth, non-porous surfaces with no splinters, nails, exposed fasteners, or sharp edges. They contain no lead or other toxic chemicals, and they're designed to meet safety regulations while providing secure, durable protection.
Our railings are virtually maintenance-free. A simple rinse with a garden hose once or twice a year keeps them looking new. The non-porous surface resists dirt, mildew, and staining, and they never need painting, sealing, or refinishing.
Yes, all our railing products feature a limited lifetime warranty that covers defects in workmanship and materials, ensuring your investment is protected for years to come. Visit our warranty page to learn more!
Our commercial railings are ideal for multi-family housing, office buildings, retail spaces, hospitality properties, healthcare facilities, and any commercial application requiring durable, professional-grade railing systems that maintain their sleek appearance under heavy use.
Our CPVC proprietary ultraviolet (UV) protection formula is engineered for durability and impact resistance, making it ideal for commercial environments. Unlike wood or aluminum that can dent, chip, or splinter, BLACKline HHP railings maintain their structural integrity and appearance even with constant use.
Yes, our commercial railing systems can be configured to meet ADA requirements and local building codes. We provide technical specifications and can work with architects and contractors to ensure compliance for your specific project.
Absolutely. We provide CSI specifications, CAD files, shop drawings, and technical documentation to make it easy for architects and designers to specify our products. Our team works directly with design professionals to ensure seamless project integration.
Lead times vary based on project size and customization requirements. Contact our commercial sales team with your project details to receive an accurate timeline and discuss expedited options, if needed.
Yes, we provide installation guidelines, technical support, and can connect commercial contractors with resources to ensure successful project completion. Our dealer network includes experienced professionals familiar with commercial installation requirements.
While we provide assembly instructions and installation guidelines, many homeowners choose professional installation to ensure compliance with safety standards and structural integrity. We can connect you with experienced installers in your area who are familiar with our products.
We offer a range of residential railing styles from clean, modern designs to more ornamental options. Each style maintains our signature deep black finish and is engineered with the same high-performance CPVC formula as our fencing products for lasting beauty and strength.
While the initial investment may be higher than wood, BLACKline HHP railings eliminate ongoing costs for staining, sealing, painting, and eventual replacement. Over the product's lifetime, you'll save significantly on maintenance while enjoying superior performance and appearance.
While the material surface absorbs heat, it does not act as a radiator or transfer significant heat to the surrounding air. Our high-heat formula is specifically designed to manage thermal load, keeping the railing structurally sound and safe to touch even in direct sunlight.
Yes, we work with homeowners to provide customized quotes that ensure proper fit and coverage for your unique space. Contact our sales team to discuss your specific dimensions and requirements. We can also put you in contact with an installer near you.
Our residential railing systems are designed to meet building code requirements and safety regulations. We recommend consulting with local building authorities to confirm specific requirements for your area, and our team can provide technical specifications as needed.
Just like a vinyl fence, a vinyl gate costs much less in the long run than other types of gates. While the prices for a vinyl fence can be slightly higher than other types of fences, the reduced costs for ongoing maintenance let you make up the difference in the long run.
Not a bit, although it's the quality of the vinyl fence that determines whether it looks "tacky" or not. Often, those who see low prices on a vinyl fence will get a cheap vinyl fence that cracks, warps, or fades and looks tacky. That doesn't happen with a BLACKline HHP fence or gate.
You can, but paint is only a surface layer, and over time, it can chip, peel, and fade, leaving your gate looking ugly. BLACKline HHP gates are mono-extruded, meaning the rich black color runs all the way through the material, not just on top.
There's nothing to flake or wear away, so your gate keeps its deep, refined look for years. That level of integrity and attention to detail is what happy customers have learned to expect from BLACKline HHP.
Our sales team works with you to ensure proper gate sizing based on your opening dimensions and application. We'll discuss swing direction, clearance requirements, and structural considerations to ensure your gate functions perfectly.
We design and manufacture gates to seamlessly match all our fencing and railing styles, from simple ranch rail gates to ornamental designs. Each gate is engineered with the same heat-resistant CPVC formula to ensure consistent performance and appearance.
No. Our CPVC formula maintains its structural integrity without sagging, melting, warping, or twisting. Unlike wood that can absorb moisture and lose shape, BLACKline HHP gates stay straight and true throughout their lifetime, even with regular use.
You can order gates separately to match your existing BLACKline HHP fencing or as part of a new fence project. Contact our sales team with details about your current fencing or planned installation, and we'll ensure perfect compatibility.
Yes! Homeowners can order directly from BLACKline HHP for a hassle-free experience. Whether you choose to install it yourself or partner with a professional, we make sure your project gets exactly what it needs for a flawless result. This direct access helps homeowners secure the premium black fence they've envisioned without compromise, so you can enjoy a refined, long-lasting finish from day one.
Yes, we're happy to connect you with local installers we've worked with before. While we don't have certified installers, we provide recommendations to ensure your fence is installed properly and your project runs smoothly.
Most black vinyl fences are made from standard PVC, which absorbs heat and can soften or warp, much like a plastic water bottle left in the sun, or turn gray in strong sunlight. BLACKline HHP is crafted from high-heat CPVC, the same material used in hot-water piping, and engineered to withstand extreme sun without losing its shape, color, or smooth finish.
That means no melting, no sagging, no chalking, and no fading. Your residential fence maintains its rich black elegance year after year, giving homeowners the confidence that their investment will look beautiful for the long term.
Absolutely. BLACKline HHP fences are smooth, splinter-free, and remain cool to the touch, even in direct sunlight, making them a safe choice for children and pets. This attention to safety ensures your yard is elegant and family-friendly, allowing kids to play freely and pets to explore safely.
Enjoy your outdoor space without worry, knowing your fence protects your family and enhances your home's curb appeal.
BLACKline HHP offers a wide range of styles, from full privacy and semi-privacy to crossbuck and ranch rail designs. Our line of privacy fences is available in both vertical and horizontal layouts, creating a sophisticated backdrop for your family events.
Choose layouts that balance openness and separation, ideal for framing a pool, defining a patio, or creating a quiet backyard retreat. Each style adds a refined, elevated look to your yard and enhances any outdoor space with durability and modern appeal.
We provide easy-to-follow planning guides, step-by-step installation resources, and access to talk to experts to support your project from start to finish.
If you prefer professional installation, we can connect you with trusted local contractors experienced in premium fencing projects. These resources ensure your BLACKline HHP fence is installed correctly, performs beautifully, and delivers the worry-free, elegant outdoor space you've imagined.
BLACKline HHP is built for contractors who can't afford failures in the field. We focus on solving the known weaknesses of black vinyl fencing, heat distortion, fading, and callbacks. We offer a partnership centered on consistency, accountability, and long-term trust, combined with a reliable domestic supply chain and direct access to experts.
BLACKline HHP is recognized as a trusted name in premium fencing, supported by rigorous field-testing, strong warranties against fading or distortion, and ongoing innovation.
Most black vinyl fencing is made from HDPE or standard PVC, which begin to soften and deform around 160°F. In direct sunlight, black fence surfaces regularly exceed 180°F. BLACKline HHP uses mono-extruded CPVC, the same material used in hot water piping, engineered to remain dimensionally stable beyond 200°F, eliminating warping, sagging, chalking, fading, and heat-related callbacks.
We provide responsive support without overcomplicating things. Contractors receive fast quotes, direct access to product experts, technical documentation, and clear communication to help projects stay on schedule, exceed client expectations, and ensure installations perform as specified.
BLACKline HHP products are engineered to solve the most common failure points in black vinyl fencing. Using mono-extruded CPVC instead of standard PVC or HDPE, our products are designed to resist heat-related warping, surface chalking, color fade, and long-term structural instability.
The result is a high-performance fence, railing, or gate system that maintains its appearance and integrity in environments where conventional vinyl products break down.
Yes. BLACKline HHP allows contractors to offer a premium black vinyl product that most local competitors simply don't have. Because our CPVC system resists melting, warping, chalking, and fading, it appeals to clients who value performance over price.
This positions your bid above commodity vinyl options, helps justify higher pricing, reduces costly callbacks, and protects your reputation on high-visibility projects.
BLACKline HHP makes every project easier with direct shipping to you or the job site, backed by a reliable domestic supply chain. We provide CAD drawings, technical specifications, CSI documentation, installation guides, and warranty information.
If questions arise, our experts are available to guide you every step of the way, giving real support from experts without a call center.